Case Report - Fully edentulous rehabilitation
Dr. Harald Fahrenholz – Zahnästhetik am Kohlmarkt
Curriculum vitae
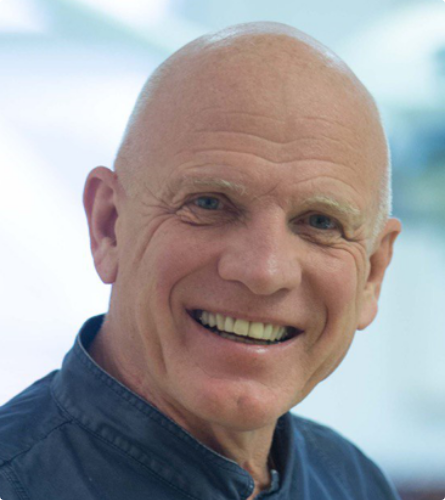
Dr. Harald Fahrenholz was born in Königssee, Bavaria, at 19.11.1949 After his education at the University of Mainz he worked 25 years in his own office in Grünwald near Munich. Later he worked together with Prof. Rolf Ewers at the CMF Clinic in Vienna. Since 2007 he is working in his own office at the Zahnästhetik am Kohlmarkt. He was influenced by teachers like Dr. Peter Kraus, P. K. Thomas, Charles Stewart, Dr. Axel Bauer, Dr. Alexander Gutowski and Lorenzo Vanini. Subsequently in implantology Dr. Axel Kirsch, Prof. Per-Ingvar Brånemark, Prof. Ulf Lekholm (CTC Courses at the Brånemark Clinic, Gothenburg), Prof. Rolf Ewers, Dr. Johan Feith and Dr. Ulrich Volz
His main emphasis is the metal-free and biologic dentistry in implantology and prosthodontics.
Introduction
Health awareness among our patients has resulted in an increasing demand for metal free implant treatments. Thanks to my friendship with Dr. Johan Feith I was introduced to Zirconia implants in general and especially the ZV3 System, now called the Patent™ Dental Implant System. I started to use the system in 2008. To evaluate the clinical performance of the system I made a retrospective evaluation of my own patients between 2009 and 2015 together with Dr Sofia Karapataki from Athens. The follow up was about 114 Patent™ Implants. Our clinical survival rate was 97,6 % and no fractures were reported for this period. Implant loss was related to bone augmentation cases, sinus lifts or immediate placements. Until today I have placed 700 Patent™ Implants and I have experienced only three fractures, all two-piece implants. In hindsight, all of them were caused by incorrect prosthetic design. We saw no detachments or fractures of the glass fiber posts. So, my results correlate very well with what has been reported by Becker et al. 2017 and Brüll et al. 2014. In both studies they also report on the favorable soft tissue response. Brüll et al. even state that the soft tissue response is favorable compared to titanium implants. I can confirm this since I have not yet seen any case of peri-implantitis associated with these implants. In this case report I would like to demonstrate the prosthetic flexibility of the Patent™ Dental Implant System and show that it can replace titanium implants also for full arch rehabilitations.
Dr. Harald Fahrenholz – Zahnästhetik am Kohlmarkt
Kohlmarkt 7/1/34, 1010 Vienna, Austria www.zahnaesthetik-wien.at
Telephone +43 664 9127454 h.fahrenholz@zahnaesthetik-wien.at
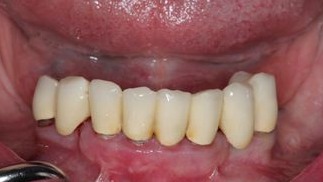
Figure 1:
Initial situation with the over 20 year old bridge
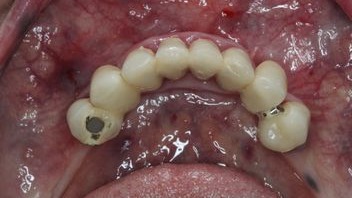
Figure 2:
Initial situation, occlusal view.
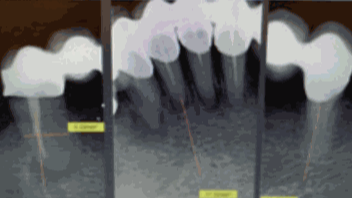
Figure 3:
Situation before extraction
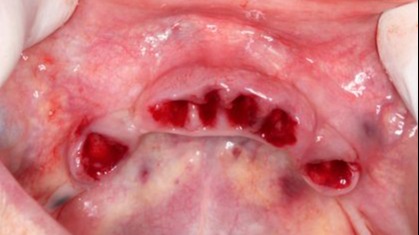
Figure 4:
Situation after tooth extraction.
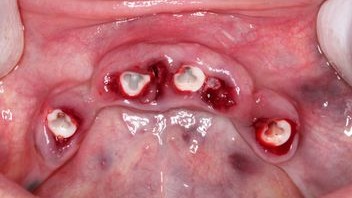
Figure 5:
Immediate implant placement without incision.
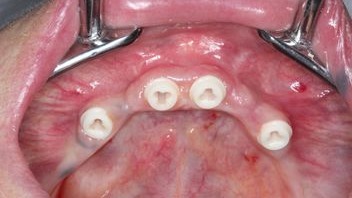
Figure 6:
Healing 3 months after implant placement
Initial Situation
70-year-old female patient presented at the author´s office, asking for a general restoration of her teeth in the lower jaw. She had a more than 20-year-old bridge from 34 – 44. (Fig. 1) The teeth 33 and 43 were bridge pontics. (Fig. 2)
Because of periodontitis marginalis profunda it was decided, with the patient´s consent, to extract all teeth and to place ceramic implants in the same session. The next decision was to make a fixed bridge or a removable overdenture. The patient preferred a bar retained overdenture to facilitate cleaning and maintenance. Why a bar? The bar retained overdenture is easy to handle for technicians, dentists and patients. The cleaning is a little bit more difficult with for example an overdenture on telescopes. In the upper jaw the patient already had a removable denture so, it was no problem for her to handle this. (Fig. 3)
Pretreatment
A DVT was performed and revealed sufficient bone in the regions of 34, 32, 41 and 44. We decided to use standard implants in the size Ø 4,5 x 11 mm for all regions.
A three months prophylaxis treatment was performed in order to reduce bacteria and achieve a better situation of the gums before extraction and implant placement. In this case we thought that an immediate loading protocol with a provisional bridge would be too much risk. So, an impression was taken to produce an immediate full denture that the patient would wear 3 months post extraction and implant placement.
Surgical procedure
After local anesthesia, the old bridge was cut in four pieces and removed. After that all teeth in the lower jaw were extracted. (Fig. 4) After inspection of the bone quality around the extraction sites the implants were placed without any incision (Fig. 5).
Normally, four implants in the lower front are placed in the regions 4 – 2 – 2 – 4. In this case the situation in region 41 was better for implantation than 42, so the implant was placed in region 41. The prefabricated immediate denture was relined to minimize the interference with the implants.
Prosthetic Reconstruction
After 3 months of healing the prosthetic work started. First the stability of all implants was evaluated with the Periotest. Typically, nominal stability is in the minus range. (Fig. 6) There are two prosthetic workflows. Either the glass fiber post is cemented on the implant, prepared and a full mouth impression is taken (chair side), or an impression is taken of the implants, including the 3C™ Connection, and the glass fiber posts can be prepare on the model (lab preparation). (Fig. 7) In this case the lab preparation procedure was chosen. (Fig. 8) In general patients appreciate if as much as possible is done outside the mouth.
When the technician has prepared the glass fiber posts, the fit of the posts have to be checked in the mouth. (Fig. 9) When the fit has been verified, the technician can produce the bar. In addition, the fit of the bar has to be verified in the mouth. (Fig. 10) When everything has been verified, the technician can finish his work with the overdenture. The secondary retentive element (matrix) was manufactured in PEEK. (Fig. 11)
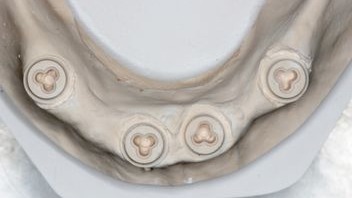
Figure 7:
Occlusal view of the model. Note the precise capture of the 3C connection.
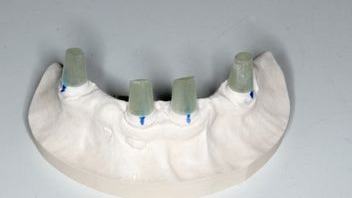
Figure 8:
In the lab preparation procedure the technician can prepare the glass fiber posts on the model.
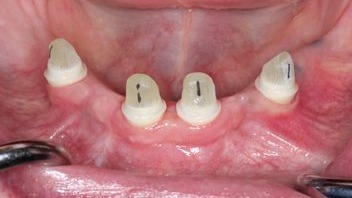
Figure 9:
Try-in of the glass fibe posts
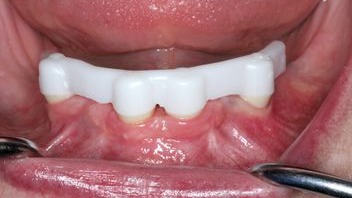
Figure 10:
Try-in of the bar.
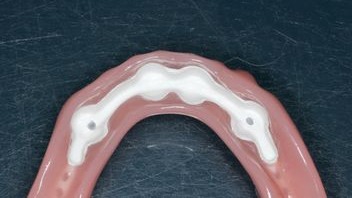
Figure 11:
The secondary retentive element fabricated from PEEK integrated in the denture.
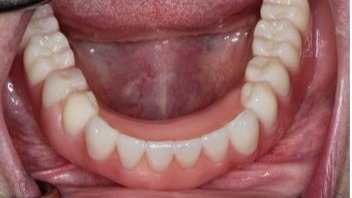
Figure 12:
Final denture in place.
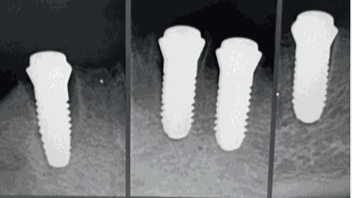
Figure 13:
X-rays immediately after implantation. See the gap at the implant 44 (left).
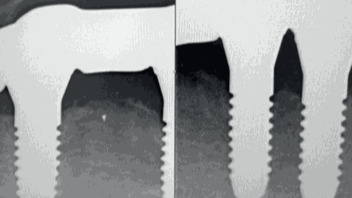
Figure 14:
5 years post op. Maintained marginal bone levels and complete closure of the gap between extraction socket wall and implant in region 44 (left).
The glass fiber posts and the bar were cemented with RelayX Unicem2. (Fig. 12) (Fig. 13) shows the radiographs at the time of implant placement. Please note the bone levels and the gap between the wall of the extraction socket and the implant, especially on the implant in the region 44. (Fig. 14) shows the radiographs of the situation five years after completion. It shows stable marginal bone levels and a complete closure between bone and implant, especially in region 44.
References
Becker J, John G, Becker K, Mainusch S, Diedrichs G, Schwarz F. Clinical performance of two-piece zirconiumimplants in the posterior mandible and maxilla: a prospective cohort study over 2 years.Clin. Oral Impl. Res. 28, 2017, 29–35 doi: 10.1111/clr.12610
Brüll F, van Winkelhoff AJ, CuneMSZirconia dental implants: a clinical, radiographic, and microbiologic evaluation up to 3 years. Int J Oral MaxillofacImplants. 2014 Jul-Aug;29(4):914-20. doi. 10.11607/jomi.3293
